Query query;
QueryBuildDataSource qbds;
QueryBuildRange qbr;
QueryRun queryrun;

date fromDate = systemDateGet();
date toDate = (systemDateGet() + 25);
query          = new Query();
qbds           = query.addDataSource(tableNum(MyTable));
qbds.addGroupByField(fieldNum(MyTable, DateField));
qbds.addGroupByField(fieldNum(MyTable, CurrencyNameField));
qbds.addSelectionField(fieldNum(MyTable, DateField));
qbds.addSelectionField(fieldNum(MyTable, CurrencyNameField));
qbds.addSelectionField(fieldNum(MyTable, EURAmountField), SelectionField::Sum);
qbds.addSelectionField(fieldNum(MyTable, USDAmountField), SelectionField::Sum);
qbr            = qbds.addRange(fieldNum(MyTable, DateField));
qbr.value(queryRange(fromDate, toDate));

queryRun = new QueryRun(query);Thursday, April 11, 2019
How to select aggregate fields using query?
AX 2012 Split Default Dimension to get Department
Public display Description Department()
{


    Name dimensionAttributeName;
    RecId DepartmentAttribute;
    DefaultDimensionView dimensionView;
    DimensionAttribute dimensionAttribute;
    DimensionAttribute      dimAttribute;

    dimensionAttributeName = "Department";
    DepartmentAttribute = DimensionAttribute::findByName('Department').RecId;


            select firstOnly dimensionView
            where dimensionView.DefaultDimension == this.DefaultDimension

            join dimensionAttribute
            where dimensionView.Name == dimensionAttribute.Name &&
            dimensionView.Name == dimensionAttributeName;
            dimAttribute = DimensionAttribute::find(dimensionView.DimensionAttributeId);
    return DimensionFinancialTag::findByFinancialTagCategoryAndValue(dimAttribute.financialTagCategory(), dimensionView.DisplayValue).Description;
}pass temporary data from Ax 2012 to SSRS
I would like to talk a little bit about the SRSTmpTblMarshaller class.
For those who doesn’t know yet, this class makes it possible to share existing temporary data between an AX object and the SSRS.
There are several ways in which you could use a temporary table with the SRSS, but let’s consider the following scenario:
Your report will be printed through a form button and that form uses a temporary table as DataSource. This data can also be manipulated by the user, so you cannot reprocess this data with the DataProvider class.
Instead of turning the temporary table (InMemory) in a regular table – I’ve saw some people doing that, you can use the SRSTmpTblMarshaller as a way batter alternative:
- In your contract class, you need to create an accessor method do keep this recordId from the SrsTmpDataStore or you can simply extend the SrsTmpTblMarshallerContract that already have this.
- In your controller class, you need to call the sendTmpTblToDataProvid method using your table buffer as parameter. This will store your table buffer as a container inside the SrsTmpDataStore table and return the recordId: protected void preRunModifyContract()
{ SrsTmpTblMarshallerContract contract = this.parmReportContract().parmRdpContract() as SrsTmpTblMarshallerContract; // get the Temp table, and marshall it across to SSRS new SRSReportRunPermission().assert(); contract.parmTmpTableDataRecId(SRSTmpTblMarshaller::SendTmpTblToDataProvider(bankReconciliationPrintoutTmp)); } - Request permission by using the assert method in the SRSReportRunPermission class
- Set the recordId inside the accessor method that you’ve created.
- Then in your data provider class you can unpack your table buffer using the method getTmpTbl from SRSTmpTblMarshaller class using as parameters the recordId from the SrsTmpDataStore table that you kept in your contract:
private void initBankReconciliationPrintoutTmp() { SrsTmpTblMarshallerContract contract = this.parmDataContract()as SrsTmpTblMarshallerContract; //Temp Table Object that was returned from SRSDataCarrier new SRSReportRunPermission().assert(); bankReconciliationPrintoutTmp = SRSTmpTblMarshaller::getTmpTbl(contract.parmTmpTableDataRecId()); SRSTmpTblMarshaller::deleteTmpTblData(contract.parmTmpTableDataRecId()); CodeAccessPermission::revertAssert(); } - Remove your buffer from the scope using the deleteTmpTblData method.
You can also check the BankReconcilliation report. It’s a good example on how to use this functionality.
Monday, April 1, 2019
How to create menu and menu item in dynamics 365?
to display any menu Dynamics 365, you need to create a menu item as the following


you configure it for specific countries by setting country region code
select the menu item, menu item type, and label
create an extension from a menu like accounts recivable as the below

add sub menu for your main menu

set properties for this menu

then build your project and refresh your browser to see changes.
create a project and add a new item, select user interface from dynamics 365 items as the below

as you see, there are multiple items items
output menu item for reports
display menu item for forms
action menu item for class
select display menu item and set name, click add
set the label (this label will display for users) and select object type form
select the object custgroup for example

save and build your solution
Now, we need to create menu for this menu item
as the same, just right click on your project and add a new item
select user interface from dynamics 365 items and choose menu as the below
set name and click add

set label for this menu and select menu item type form
locate your menu item name as the below

you configure it for specific countries by setting country region code
select the menu item, menu item type, and label
create an extension from a menu like accounts recivable as the below

add sub menu for your main menu

set properties for this menu

then build your project and refresh your browser to see changes.
Dynamics 365 F&O Export Import projects between environments
Sometimes, the developer needs to use the previous development in other projects, so To transfer elements to a different installation, you can use a project package file.
to use a project package file , just export project 1-Export project
Right-click on your project and click export
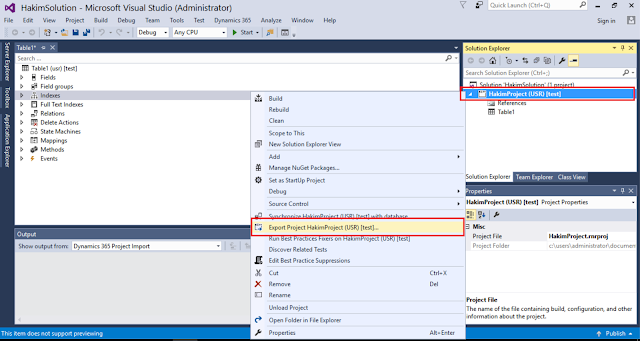
set name and select the path that you need to save

A project package contains all the elements from the project.
Project package files have the .axpp file name extension.
just wait until export finish

2-import project
To use the contents of a project package file, you must import the .axpp file into an installation.
go to dynamics 365 tab in visual studio and click import

note
The elements from the project package file will be imported into the same model that they were exported from. If that model doesn’t exist in the installation, it will be created during the import process.
you can check this link for more details.
https://docs.microsoft.com/en-us/dynamics365/unified-operations/dev-itpro/dev-tools/projects
specify the location for project file that you need to import and click overwrite if you need to overwrite the existing element

also, you can open this project in the current solution or create new if you need
you can select all elements or specific element form details, just check or uncheck
click OK
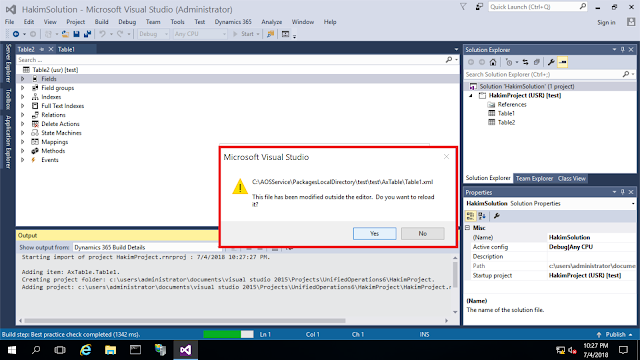
click ok to reload
also, the built must be stopped before the project can be closed

you can stop built from the built tab and click cancel

you can view history to compare the previous version and checked in version to see the difference.
just right click on your element and click view history

Thanks.
Saturday, March 30, 2019
AX2012 Print Dynamic Parameters
in addition to parameters specified in data contracts, reports can also use queries. It’s very handy, because users can specify filters and sorting in exactly the same way as they’re used to from other places in Dynamics AX, they can use query expressions and so on.


A relative common request is printing parameter values on the report itself. It’s easy with parameters defined in data contracts – an expression like =Parameters!UsersToInclude.Value will do the job. But the same approach doesn’t work with dynamic parameters (that’s how query parameters get represented in SSRS).
I recommend the following approach. Use a report data provider class – very often, it’s already in place. Add a new data table to hold information about query ranges and expose it to the report. I’m using an existing table, TmpSysQuery, so we don’t have to discuss the design of the table. In processReport(), we extract ranges from the current query and save them to our temporary table.

class LedgerJournalPostControlDP extends SRSReportDataProviderBase
{

    TmpSysQuery tmpSysQuery;
}

[SRSReportDataSetAttribute(tablestr(TmpSysQuery))]
public TmpSysQuery getTmpSysQuery()
{
    select tmpSysQuery;
    return tmpSysQuery;
}

public void processReport()
{

    tmpSysQuery = MyQueryUtils::rangesToTable(this.query());
}
public static TmpSysQuery rangesToTable(Query _query)
{
    QueryBuildDataSource    qbds;
    QueryBuildRange         queryBuildRange;
    TmpSysQuery             tmpSysQuery;
    LabelType               tableLabel;
    int                     occurrence;
    int                     dataSourceNo;
    int                     i;

    if (!_query)
    {
        return tmpSysQuery;
    }

    for (dataSourceNo = 1; dataSourceNo <= _query.dataSourceCount(); dataSourceNo++)
    {
        qbds = _query.dataSourceNo(dataSourceNo);
        if (qbds.enabled())
        {
            occurrence = SysQuery::tableOccurrence(_query, qbds.table(), dataSourceNo);
            tableLabel = tableId2pname(qbds.table()) + SysQuery::tableOccurrenceText(occurrence);

            for (i = 1; i <= qbds.rangeCount(); i++)
            {
                queryBuildRange = qbds.range(i);

                if (queryBuildRange.value() && queryBuildRange.status() != RangeStatus::Hidden)
                {
                    tmpSysQuery.clear();
                    tmpSysQuery.DataSourceNo = qbds.uniqueId();
                    tmpSysQuery.TableLabel   = tableLabel;
                    tmpSysQuery.FieldLabel   = fieldId2pname(qbds.table(), queryBuildRange.field());
                    tmpSysQuery.RangeValue   = queryBuildRange.value();
                    tmpSysQuery.insert();
                }
            }
        }
    }

    return tmpSysQuery;
}
Then we add a new data set in our report and show query ranges in a tablix in exactly the same way as other data:
Sunday, November 19, 2017
How to change the DashboardSettings of maximum controls limit in Dynamics
The maximum number of controls allowed on CRM2011, CRM 2013 Or CRM2015 dashboards is 6. You cannot put the more than 6 graphs/charts/iframes/web resources etc. on the dashboard.
We can extend the number of controls as per the user needs. This setting is applied to the server not a organization setting. So you cannot change this setting for CRM Online but you can change this for an on-premise installation.
Sometimes You may get the message saying something like “Add-PSSnapin : Cannot add Windows PowerShell snap-in Microsoft.Crm.PowerShell because it is already added.” It is fine no problem.
3. Run the following 3 commands
$setting = Get-CrmSetting -SettingType DashboardSettings
$setting.MaximumControlsLimit = 10
Set-CrmSetting -Setting $setting
After that open CRM, still you will be see only 6 components on the dashboard design, however you can add extra components based on how much you have set the limit.
Once you crossed the limit you will get following error message.

Note the maximum is 20
We can extend the number of controls as per the user needs. This setting is applied to the server not a organization setting. So you cannot change this setting for CRM Online but you can change this for an on-premise installation.
- Open the Windows Power Shell command window
- Add the Microsoft Dynamics CRM PowerShell snap-in using
Sometimes You may get the message saying something like “Add-PSSnapin : Cannot add Windows PowerShell snap-in Microsoft.Crm.PowerShell because it is already added.” It is fine no problem.
3. Run the following 3 commands
$setting = Get-CrmSetting -SettingType DashboardSettings
$setting.MaximumControlsLimit = 10
Set-CrmSetting -Setting $setting
After that open CRM, still you will be see only 6 components on the dashboard design, however you can add extra components based on how much you have set the limit.
Once you crossed the limit you will get following error message.
Note the maximum is 20
Subscribe to:
Posts (Atom)